Part 1: General Provisions
1.1 Equipment Overview
This system is a two-stage pure yeast propagation system dedicated to beer brewing, consisting of a 20L Carlsberg Tank, a 250L Yeast Propagation Tank, and supporting sterile air supply, temperature control, and CIP cleaning systems.
The core function of the system is to perform primary activation and stepwise scale-up cultivation of laboratory pure yeast strains, supplying highly active, high-purity, contamination-free, and robust yeast cultures for the beer fermentation process. This ensures fermentation stability and final beer quality.
1.2 Scope of Application
This manual applies to the complete operational procedure of the two-stage propagation system (20L Carlsberg Tank → 250L Yeast Propagation Tank), including:
~ Charging
~ Sterilization
~ Inoculation
~ Cultivation
~ Transfer
~ Discharge
~ Cleaning
~ Maintenance
~ It is applicable to brewery and craft brewery yeast propagation processes.
~ This system is strictly intended for pure beer yeast cultivation only.
~ Use for other materials or operation beyond specified parameters is strictly prohibited.
1.3 Personnel Qualification Requirements
~ Operators must receive dedicated training on this equipment and be fully familiar with its structure, performance, operating procedures, and safety regulations.
~ Operators must master core aseptic microbiological procedures and be familiar with beer yeast cultivation technology requirements. Strict aseptic operation must be maintained throughout the entire process to prevent microbial contamination.
~ Operators must wear required personal protective equipment (heat-resistant gloves, safety goggles, sterile work clothing, cap, and mask). Unauthorized or improper operation is strictly prohibited.
Part 2: Main Technical Parameters and Structural Principles
2.1 Core Technical Parameters
| Item | 20L Carlsberg Tank | 250L Yeast Propagation Tank |
| Nominal Effective Volume | 20L | 250L |
| Total Volume | 25L | 423L |
| Tank Material | Food-grade SUS304, internal surface Ra ≤ 0.2 μm | Food-grade SUS304, internal surface Ra ≤ 0.6 μm |
| Design Pressure | 0.2 MPa | 0.2 MPa, jacket 0.3 MPa |
| Design Temperature | <100°C | Tank: -10~150°C; Jacket: -10~150°C |
| Working Temperature | Tank: 5~100°C | Tank: -5~140°C; Jacket: -5~140°C |
| Heat Exchange Method | / | Honeycomb jacket |
| Sterilization Method | Autoclave sterilization | Steam-In-Place (SIP) |
| Sterile Air System | / | 0.01 μm sterilizing-grade air filter, two-stage filtration, steam sterilizable |
| Safety Accessories | Safety valve | Safety valve, pressure gauge, temperature sensor, level gauge, vacuum valve |
2.2 Equipment Structural Composition
2.2.1 Core Structure of 20L Carlsberg Tank
~ Tank body
~ Aseptic flange
~ Aseptic sampling valve
~ Inlet/outlet ports
~ Safety valve
~ Exhaust port
~ Handles
2.2.2 Core Structure of 250L Yeast Propagation Tank
~ Tank body
~ Lower steam jacket
~ Upper chilled water jacket
~ Sterile aeration disc
~ CIP spray ball
~ Sterile inoculation port
~ Sterile sampling valve
~ Wort inlet
~ Yeast outlet
~ Steam inlet
~ Cooling media inlet
~ Exhaust port
~ Two-stage sterile air filtration system
~ Temperature sensor
~ Pressure gauge
~ Level gauge
~ Sight glass
~ Safety accessories
~ Transfer pipeline system
2.2.3 Supporting Systems
~ Sterile compressed air system
~ Steam generation system
~ Cooling/heating medium temperature control system
~ CIP cleaning system
~ Pipeline and valve assemblies
~ Electrical control system
2.3 Working Principle
~ This system adopts a stepwise scale-up propagation process with a multiplication factor controlled at approximately 10× per stage, in accordance with yeast growth kinetics.
~ Laboratory-activated pure yeast (from flask or slant culture) is first inoculated into the 20L Carlsberg Tank. Under aseptic, constant-temperature, and properly aerated conditions, primary activation and propagation are completed to obtain high-viability yeast seed culture.
~ The yeast seed culture is then transferred aseptically via pressure differential into the pre-sterilized and prepared 250L Yeast Propagation Tank for second-stage scale-up cultivation.
~ The final output is a sufficient quantity of high-activity pure yeast suitable for fermentation pitching.
~ Throughout the process:
~ Temperature control and aeration systems ensure stable yeast growth.
~ Full-process aseptic control prevents microbial contamination.
2.4 Operation Interface
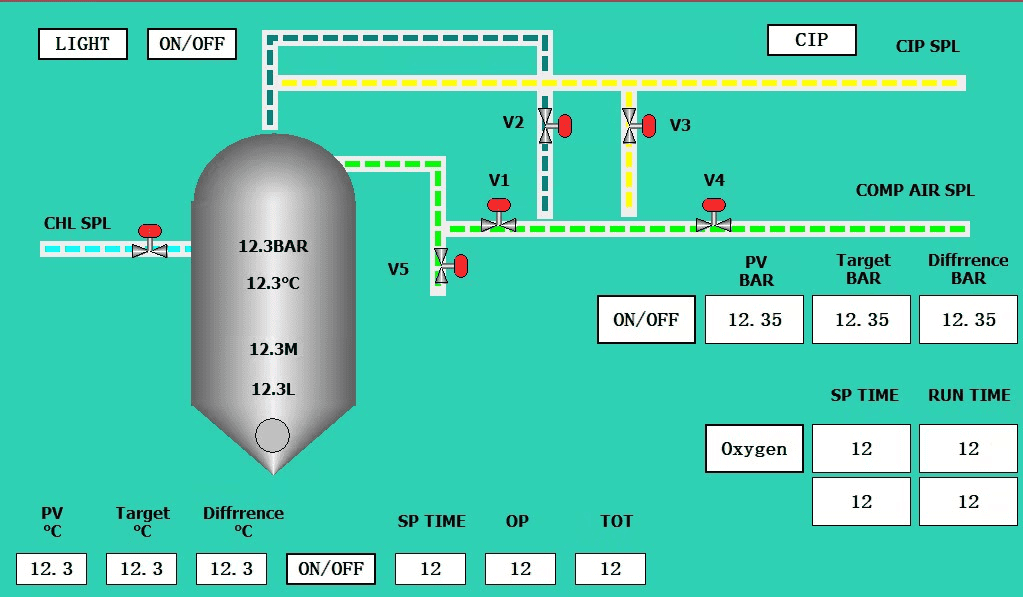
The PLC system is equipped with the following functions:
~ PT100 automatic/manual temperature control, controlling one DC24V chilled water solenoid valve output.
~ Yeast tank sight light switch: DC24V, 50W, controlled via HMI start/stop.
~ Tank top pressure sensor: enables constant pressure control, linked with pneumatic butterfly valve/pneumatic angle seat valve.
~ Tank bottom pressure sensor: combined with top pressure transmitter to calculate and display tank volume.
~ Yeast tank level switch: interlocked with CIP cleaning empty-level protection.
~ Sterile air system equipped with flowmeter for real-time display and metering.
Part 3: Safety Operation Instructions
3.1 Vessel Safety
~ Overpressure and overtemperature operation are strictly prohibited.
~ Safety valves and pressure gauges must be calibrated regularly (at least once per year).
~ Removal, blocking, or bypassing of safety accessories is strictly prohibited.
~ Pressurization and depressurization must be performed slowly.
~ Sudden pressure increase or rapid depressurization is strictly forbidden.
3.2 High-Temperature Sterilization Protection
~ During steam sterilization, operators must wear heat-resistant gloves and safety goggles at all times. Direct contact with high-temperature tank surfaces, pipelines, or valves is strictly prohibited.
~ Warning signsmust be installed in the sterilization area. Unauthorized personnel are strictly prohibited from approaching.
~ During sterilization, it is strictly forbidden to stand directly in front of exhaust ports or sampling valves to avoid steam burns.
3.3 Aseptic Operation Red Line
~ All components, pipelines, and interfaces in contact with materials must be completely sterilized before use.
~ Inoculation, transfer, and sampling operations must be performed under flame protection within an aseptic environment.
~ Direct hand contact with sterile surfaces is strictly prohibited. Talking or coughing during operation is strictly forbidden to prevent aerosol contamination.
3.4 Electrical Safety
~ Operating electrical equipment with wet hands is strictly prohibited.
~ The electrical control cabinet must be protected from water ingress. Equipment grounding must be reliable.
~ In case of electrical malfunction, the main power supply must be disconnected before inspection. Maintenance must be performed by qualified electricians only. Live disassembly is strictly prohibited.
3.5 Media Safety
~ Refrigerants, detergents, and lubricants must comply with food-grade requirements.
~ Sterilization steam must be clean saturated steam. Industrial steam containing oil or impurities is strictly prohibited.
~ Process parameters must not be altered arbitrarily during cultivation to prevent yeast activity damage.
3.6 Emergency Handling
~ In case of leakage, overpressure, abnormal noise, temperature control failure, or other abnormalities, operation must be stopped immediately. Close steam, cooling medium, and air valves. Depressurize and cool down before troubleshooting. Maintenance under pressure or temperature is strictly prohibited.
~ In case of personal injury such as burns or electric shock, immediately stop operation, initiate emergency response procedures, and report the incident.
Part 4: Standard Operating Procedures
4.1 Pre-Commissioning Preparation and Inspection
According to the P&ID requirements, correctly connect:
~ Steam supply line
~ Glycol supply line
~ Glycol return line
~ Compressed air supply line
~ CIP supply line
4.1.1 Equipment Integrity Inspection
~ Check tank body, jacket, and pipelines for deformation, leakage, or corrosion. Seals must show no aging or damage. Valves must operate smoothly without sticking. Valve status must match identification labels.
~ Verify that pressure gauges, temperature sensors, level gauges, and safety valves function properly and are within calibration validity.
~ Check sterile air filter elements for integrity, dryness, and service life validity. Ensure CIP spray balls rotate normally without blockage.
~ Verify normal supply of steam, compressed air, cooling and heating media. Pressure must meet equipment requirements. Electrical control system parameters must display normally, and alarm functions must be operational.
4.1.2 Material and Media Preparation
~ Culture medium preparation: Use brewing cold wort with concentration 10–12°P, pH 5.2–5.4, free of protein precipitation and microbial contamination.
~ Prepare 75% medical alcohol, alcohol swabs, alcohol lamp, sterile sampling bottles, microscope, hemocytometer, and other testing and sterilization tools.
~ Confirm yeast strain viability and absence of contamination. At least two parallel backup cultures must be prepared.
4.2 CIP Cleaning and Sterilization
4.2.1 CIP Cleaning Procedure (Must Be Performed Before and After Each Cultivation)
~ Water Rinse: Circulate clean water at ambient temperature for 10 minutes. Drain until discharge is clear and free of impurities.
~ Alkaline Cleaning: Use 2–3% food-grade sodium hydroxide solution at 80–85°C. Circulate for 20–30 minutes. Drain alkaline solution.
~ Water Rinse: Rinse with clean water for 10 minutes until discharge pH is neutral and free of alkali residue.
~ Acid Cleaning (If Required): When severe wort scaling occurs, use 1.5% food-grade nitric acid at 60–65°C. Circulate for 15–20 minutes. Drain acid solution.
~ Final Rinse: Rinse with purified water for 15 minutes to ensure no detergent residue remains.
~ After completion, close all drain and outlet valves. Keep the tank sealed for sterilization preparation.
4.2.2 Empty Tank Sterilization (SIP – Empty)
1. 20L Carlsberg Tank
~ Close outlet and inoculation valves. Open exhaust valve and sterile air filter bypass valve. Slowly introduce clean saturated steam.
~ Raise temperature to 121°C, tank pressure 0.11–0.12 MPa. Maintain for 30 minutes.
~ After sterilization:
~ Close steam valve. Slowly close exhaust valve. Introduce sterile compressed air via sterile filter to maintain slight positive pressure (0.02–0.03 MPa). Cool naturally to room temperature for standby.
2. 250L Propagation Tank
~ Close outlet and inoculation valves. Open exhaust valve, breather valve bypass, and sterile air line sterilization valve. Close CIP line valves and install blind plates.
~ Introduce saturated steam slowly. Raise to 121°C, pressure 0.11–0.12 MPa. Maintain for 30 minutes.
~ Simultaneously sterilize transfer lines, inoculation lines, sampling lines, and air filtration system to ensure all material-contact parts reach sterilization temperature and time.
~ After sterilization. Close steam valve. Slowly close exhaust valve. Introduce sterile compressed air to maintain 0.02–0.03 MPa positive pressure. Activate temperature control to precool to inoculation temperature.
4.2.3 Medium Sterilization (Full Tank Sterilization)
1. 20L Carlsberg Tank
~ Fill prepared wort aseptically. Sterilize using autoclave.
~ Heat to 121°C, pressure 0.1 MPa. Maintain 30–40 minutes.
~ After sterilization, rapidly cool to inoculation temperature:
~ Lager yeast: 9–12°C
~ Ale yeast: 18–22°C
~ Maintain slight positive pressure during cooling. Negative pressure formation is strictly prohibited.
2. 250L Propagation Tank
~ Pump 200L wort into tank. Seal tank. Introduce steam slowly.
~ Heat to 118–121°C, pressure 0.105 MPa. Maintain 20–30 minutes.
~ After sterilization:
~ Close steam valve. Activate jacket cooling medium to rapidly cool to inoculation temperature. Maintain sterile compressed air positive pressure throughout cooling.
4.3 Carlsberg Tank Inoculation and Cultivation
4.3.1 Pre-Inoculation Preparation
~ Sterilize inoculation environment using UV lamp for ≥30 minutes.
~ Operators must change into sterile clothing, mask, and gloves. Disinfect inoculation port area with 75% alcohol. Establish flame protection zone around inoculation port.
4.3.2 Aseptic Inoculation
~ Before inoculation, introduce sterile air at 8 L/min for 5 minutes to achieve dissolved oxygen 8–10 mg/L.
~ Under flame protection, quickly open inoculation port and transfer activated yeast culture (5–10% of wort volume). Close port immediately.
4.3.3 Cultivation Parameters
Lager Yeast
~ Temperature: 9–12°C
~ Aeration: Every 4 hours
~ Duration per aeration: 2–3 minutes
~ Aeration rate: 5 L/min
~ Cultivation cycle: 24–36 hours
Ale Yeast
~ Temperature: 18–22°C
~ Aeration: Every 4 hours
~ Duration per aeration: 2–3 minutes
~ Aeration rate: 5 L/min
~ Cultivation cycle: 24–36 hours
4.3.4 Process Monitoring
~ Sample every 8 hours for microscopic examination. Observe morphology, budding rate, and contamination.
~ Monitor cell count, mortality rate, and wort gravity reduction.
~ If contamination is detected, immediately terminate cultivation and perform complete cleaning and sterilization.
4.3.5 Cultivation Endpoint Criteria
~ Cell count ≥ 1×10⁸ cells/mL
~ Budding rate ≥ 15%
~ Mortality < 1%
~ No contamination
~ Wort gravity reduced to 2–3°P
~ Proceed to transfer to 250L propagation tank.
4.4 Aseptic Transfer Operation from 20L Carlsberg Tank to 250L Propagation Tank
Core Principles:
~ Full aseptic control
~ Pressure differential transfer
~ No sterilization dead zones
~ No air exposure
4.4.1 Preparation Before Transfer
~ Confirm that the wort in the 250L propagation tank has completed sterilization and cooling.
~ The temperature difference between the propagation tank wort and the 20L Carlsberg tank yeast culture must be ≤ 2°C.
~ Maintain slight positive pressure inside the 250L tank at 0.02 MPa.
~ The yeast culture in the 20L Carlsberg tank must pass microscopic inspection, be free from contamination, and meet cultivation standards.
~ Use sterile sanitary piping to connect the outlet of the 20L Carlsberg tank to the sterile sampling valve of the 250L propagation tank.
~ Disinfect all pipe connections and the transfer line with 75% alcohol or 0.5% diluted phosphoric acid for 5 minutes.
4.4.2 Pressure Differential Adjustment
~ Close the exhaust valve of the 20L Carlsberg tank.
~ Slowly introduce sterile compressed air into the 20L tank and increase the internal pressure to 0.05 to 0.06 MPa.
~ Ensure that the pressure in the 20L tank remains at least 0.03 MPa higher than that in the 250L propagation tank at all times.
~ The propagation tank pressure must never exceed the Carlsberg tank pressure to prevent backflow contamination.
4.4.3 Transfer Completion
~ After all yeast culture has been transferred, first close the outlet valve of the 20L Carlsberg tank, then close the inoculation valve of the 250L propagation tank.
~ Remove the transfer piping and disinfect the connection interfaces with alcohol.
~ After transfer is completed, activate the aeration system of the 250L propagation tank and operate at 10 L/min for 10 minutes to ensure thorough mixing of the yeast seed culture with the wort.
4.5 Cultivation Operation of 250L Propagation Tank
4.5.1 Cultivation Parameter Settings
Lager Yeast
~ Cultivation temperature: 10 to 13°C.
~ During the initial stage, introduce sterile air every 2 hours for 5 to 10 minutes each time at an aeration rate of 10 to 15 L/min.
~ After 12 hours, adjust aeration to once every 4 hours.
~ Total cultivation period: 36 to 48 hours.
~ During cultivation, gradually reduce temperature to match the fermentation tank temperature in the fermentation workshop to achieve yeast adaptation.
Ale Yeast
~ Cultivation temperature: 18 to 20°C.
~ During the initial stage, introduce sterile air every 2 hours for 5 to 10 minutes each time at an aeration rate of 10 to 15 L/min.
~ After 12 hours, adjust aeration to once every 4 hours.
~ Total cultivation period: 36 to 48 hours.
~ Gradually reduce temperature according to fermentation requirements to achieve yeast adaptation.
~ Maintain slight positive pressure inside the tank at 0.02 to 0.03 MPa throughout the process. Negative pressure formation inside the tank is strictly prohibited.
4.5.2 Process Monitoring
~ Take samples every 8 hours for microscopic examination. Observe yeast morphology, budding rate, and flocculation characteristics. Strictly inspect for contamination by wild yeast or anaerobic bacteria. If contamination is detected, immediately terminate cultivation, dispose of contaminated material according to regulations, and perform complete sterilization of the equipment.
~ Every 12 hours, measure yeast cell count, mortality rate, budding rate, wort gravity, and pH value. Maintain complete cultivation records.
~ In the later stage of cultivation, reduce aeration appropriately based on yeast growth conditions to prevent over-proliferation and activity decline.
4.5.3 Cultivation Endpoint Determination
~ Yeast cell count ≥ 0.8 × 10^8 cells/mL.
~ Budding rate ≥ 20%.
~ Mortality rate < 1%.
~ No microbial contamination detected.
~ Wort gravity reduced by 3 to 4°P.
~ Yeast activity meets fermentation requirements.
~ When all criteria are satisfied, cultivation is considered complete. Prepare for discharge to the fermentation tank or for cold storage preservation.
4.6 Discharge and Post-Shutdown Operations
4.6.1 Yeast Discharge
~ Before discharge, sterilize discharge pipelines and valves with steam and disinfect with alcohol.
~ Slowly introduce sterile compressed air into the propagation tank to maintain internal pressure at 0.05 MPa.
~ Open the discharge valve and transfer yeast culture smoothly to the fermentation tank or yeast storage tank by pressure differential.
~ Maintain aseptic operation throughout the discharge process to prevent secondary contamination.
4.6.2 Post-Operation Cleaning and Sterilization
~ Immediately after yeast discharge, perform CIP cleaning on the Carlsberg tank, propagation tank, and all pipelines and valves. Follow the procedure specified in section 4.2.1.
~ After cleaning, conduct empty tank sterilization at 121°C for 30 minutes.
~ Upon completion, introduce sterile air to maintain dry conditions and slight positive pressure inside the tank for standby.
4.6.3 Shutdown Operation
~ For long-term shutdown, close all media valves and the main power switch.
~ Drain all residual liquid from the tank, jacket, and pipelines.
~ Perform comprehensive cleaning and maintenance of the equipment.
~ Replace sterile air filter cartridges.
~ Seal all openings and complete shutdown documentation records.
Part 5: Equipment Maintenance and Servicing
5.1 Routine Maintenance (Before and After Each Use)
~ Inspect tank body, pipelines, valves for leakage or deformation.
~ Verify normal operation of pressure gauges, temperature sensors, and level gauges.
~ Perform CIP cleaning after each use. Maintain dry slight positive pressure after sterilization.
~ Inspect sterile air filters for blockage or moisture. Replace immediately if abnormal.
~ Clean external surfaces. Keep electrical cabinet dry and dust-free.
5.2 Periodic Maintenance
Weekly
~ Check valve flexibility
~ Verify safety valve and breather valve function
Monthly
~ Calibrate temperature sensors and pressure gauges
~ Inspect CIP spray balls
~ Check heat exchange jackets for scaling
~ Inspect electrical wiring terminals
Quarterly
~ Replace sterile air filter cartridges (shorten interval if high frequency use)
~ Inspect sampling and inoculation valves, replace seals
~ Tighten all fasteners
Annual
~ Comprehensive calibration and replacement of safety accessories
~ Pressure test tank and jacket
~ Replace aged seals
~ Perform anti-corrosion treatment
~ Update technical documentation
5.3 Key Component Maintenance Points
5.3.1 Sterile Filters
~ No overtemperature or overpressure operation. Dry after each steam sterilization. Replace immediately if contamination or high resistance occurs. Perform integrity test after replacement.
5.3.2 Flange Seals
~ Adjust tightening if leakage occurs. Replace immediately if severe leakage. Operation with defective seals is prohibited.
5.3.3 Heat Exchange System
~ Regularly check heat transfer efficiency. Perform descaling when necessary. Avoid sudden temperature changes to prevent deformation or cracking.
5.3.4 Instrumentation System
~ All measuring instruments and safety accessories must be regularly calibrated. Expired or inaccurate instruments must not be used. Replace faulty instruments immediately. Unauthorized adjustment is prohibited.
Part 6: Common Faults and Troubleshooting Methods
| Fault Phenomenon | Common Causes Analysis | Corrective Actions |
| Microbial contamination detected after sterilization | 1. Insufficient sterilization temperature or holding time; cold air not completely vented, resulting in false pressure. 2. Dead corners in pipelines, valves, or connections where sterilization is ineffective. 3. Sterile filter cartridge damaged or moisture saturated, leading to filtration failure. 4. Aging or damaged seals allowing external air backflow after sterilization. 5. Inoculation, transfer, or sampling operations violating aseptic procedures. | 1. Strictly follow the sterilization procedure, fully vent cold air, and ensure 121°C holding time meets requirements. 2. Optimize pipeline layout and sterilize dead corners separately to ensure full sterilization coverage. 3. Replace sterile filter cartridges and perform integrity testing after sterilization. 4. Replace aged seals and maintain slight positive pressure inside the tank after sterilization. 5. Strengthen aseptic operation training; when environmental hygiene is suboptimal, perform operations under flame protection. |
| Abnormal tank temperature control; abnormal heating or cooling | 1. Temperature sensor malfunction or calibration drift. 2. Steam or cooling medium valve sticking or blockage, insufficient medium flow. 3. Severe scaling in jacket or coil, reducing heat transfer efficiency. 4. Incorrect temperature control parameter settings; abnormal PID regulation. | 1. Calibrate or replace the temperature sensor to ensure accurate data. 2. Inspect and clean valves; check medium supply pressure to ensure adequate flow. 3. Perform acid cleaning to remove scale and restore heat transfer efficiency. 4. Reset temperature control parameters and tune PID control functions. |
| Abnormal tank pressure; overpressure or pressure loss | 1. Safety valve malfunction or blockage, failing to actuate during overpressure. 2. Incorrect operation of inlet or exhaust valves; pipeline blockage. 3. Rapid temperature fluctuations causing sharp pressure variation. 4. Leakage in tank body, pipelines, or seals leading to pressure loss. 5. Vacuum relief valve failure resulting in negative pressure. | 1. Inspect, clean, or replace safety valves to ensure proper function. 2. Verify valve positions, clear blocked pipelines, and standardize gas inlet and exhaust operations. 3. Strictly control heating and cooling rates; avoid rapid temperature changes. 4. Identify leakage points, replace seals, and tighten loose components. 5. Repair or replace vacuum relief valves and maintain slight positive pressure in the tank at all times. |
| Abnormal yeast growth; low activity and slow proliferation | 1. Wort medium concentration, pH, or nutrient composition not meeting requirements. 2. Insufficient dissolved oxygen; inadequate aeration rate or duration. 3. Improper cultivation temperature not suitable for yeast characteristics. 4. Aged yeast strain with low vitality; insufficient inoculation rate. Mild microbial contamination competing with yeast for nutrients. | 1. Optimize wort formulation to ensure proper concentration, pH, and nutrient levels. 2. Adjust aeration parameters to ensure sufficient dissolved oxygen in the wort. 3. Set cultivation temperature according to yeast strain characteristics and gradually reduce temperature for adaptation. 4. Replace with high-activity yeast strain and control inoculation rate according to specifications. 5. Conduct microscopic examination for contaminants; terminate abnormal cultivation, perform thorough sterilization, and restart with fresh material. |
| Poor CIP cleaning performance; residue or scaling inside tank | 1. Cleaning solution concentration, temperature, or circulation time not meeting requirements. 2. Spray ball clogged or damaged, resulting in incomplete coverage. 3. Dead corners in pipelines or valves retaining residual material. 4. Severe scaling that cannot be removed in a single cleaning cycle. | 1. Prepare cleaning solution strictly according to specifications; control temperature and circulation time. 2. Inspect, clean, or replace spray balls to ensure 360° coverage without dead corners. 3. Disassemble and clean dead corners separately; optimize CIP pipeline configuration. 4. Add an acid cleaning cycle to completely remove scale and implement periodic descaling. |
Part 7: Appendices
Appendix 1 Yeast Propagation Process Record Form
| Date | |||
| Batch No. | |||
| Strain Type | |||
| Wort Concentration / °P | |||
| Filling Volume / L | |||
| Inoculation Rate / % | |||
| Cultivation Temperature / °C | |||
| Cultivation Time / h | |||
| Yeast Cell Count (cells/mL) | |||
| Budding Rate / % | |||
| Mortality Rate / % | |||
| Microscopic Examination Result (Contamination: Yes/No) | |||
| Sugar Reduction / °P | |||
| Operator | |||
| Remarks |
Appendix 2 Daily Equipment Inspection Checklist
| Inspection Date | Equipment No. | Inspection Item | Inspection Standard | Inspection Result (Normal/ Abnormal) | Corrective Action | Inspector | Reviewer |
| Tank and pipeline sealing integrity | No leakage, no deformation, no corrosion | ||||||
| Instrument display | Pressure gauge and thermometer functioning properly and within calibration validity | ||||||
| Sterile filter | No moisture, no blockage, filter cartridge intact | ||||||
| Valve status | Flexible operation, no sticking, correct labeling |
Appendix 3 Core Aseptic Operation Guidelines
~ All components, pipelines, and connections that come into contact with materials or yeast must be sterilized by steam at 121°C for no less than 30 minutes to ensure there are no sterilization dead corners.
~ Inoculation, transfer, and sampling operations must be carried out in an aseptic environment. Operators must wear complete sterile protective equipment and perform flame protection throughout the operation. Direct hand contact with sterile parts is strictly prohibited.
~ After sterilization, equipment and pipelines must maintain slight positive pressure (0.02–0.03 MPa) at all times. The formation of negative pressure that may cause external air backflow and contamination is strictly prohibited.
~ During aseptic operations, talking, coughing, or any behavior that may generate aerosols is strictly prohibited to prevent contamination. All tools must be sterilized in advance and assigned for dedicated use only.
~ After each operation, disinfect the operating area and equipment interfaces with alcohol, complete the aseptic operation records, and report any abnormalities immediately.